All You Need To Know About Accessing CLI with Telnet and SSH in this article explain how to access CLI with telnet and SSH using user and enable (privileged) modes, password security for CLI access from the console.
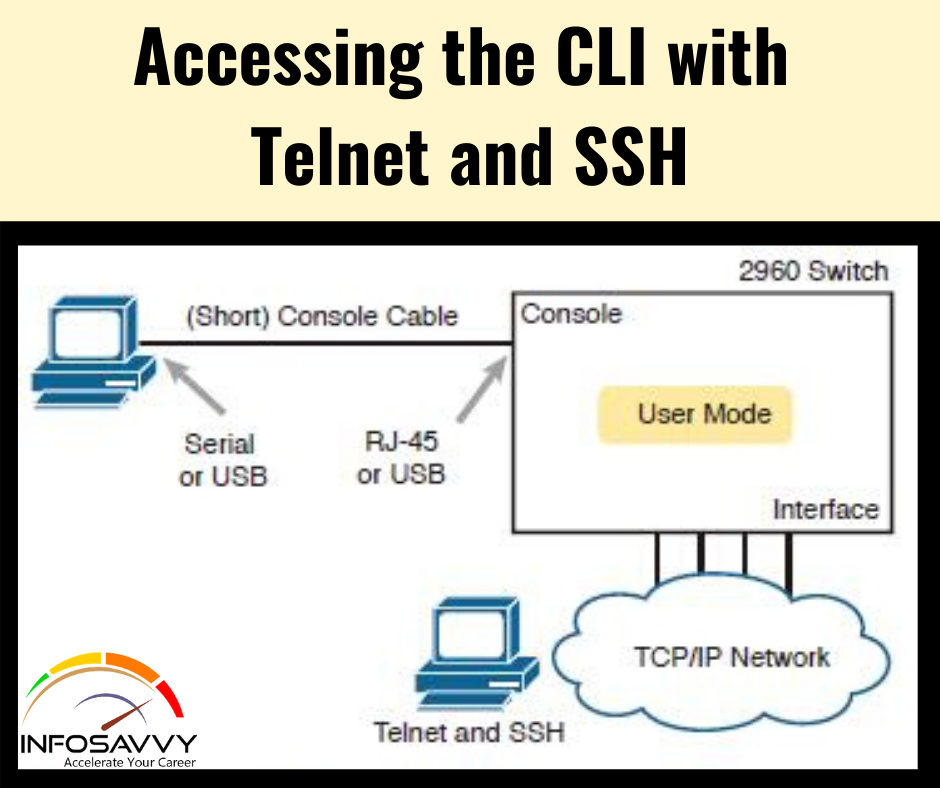
For many years, terminal emulator applications have supported much more than the power to speak over a serial port to a local device (like a switch’s console). Terminal emulators support a variety of TCP/IP applications also , including Telnet and SSH. Telnet and SSH both allow the user to connect to a different device’s CLI, but rather than connecting through a console cable to the console port, the traffic flows over an equivalent IP network that the networking devices are helping to make . Telnet uses the concept of a Telnet client (the terminal application) and a Telnet server (the switch during this case). A Telnet client, the device that sits ahead of the user, accepts keyboard input and sends those commands to the Telnet server. The Telnet server accepts the text, interprets the text as a command, and replies back. Telnet may be a TCP-based application layer protocol that uses well-known port 23. Cisco Catalyst switches enable a Telnet server by default, but switches need a couple of more configuration settings before you’ll successfully use Telnet to attach to a switch. Chapter 8 covers switch configuration to support Telnet and SSH in detail. Using Telnet during a lab today makes sense, but Telnet poses a big security risk in production networks. Telnet sends all data (including any username and password for login to the switch) as clear-text data. SSH gives us a way better option.
Think of SSH because the far more secure Telnet cousin. Outwardly, you still open a terminal emulator, hook up with the switch’s IP address, and see the switch CLI, regardless of whether you use Telnet or SSH. The differences exist behind the scenes: SSH encrypts the contents of all messages, including the passwords, avoiding the likelihood of somebody capturing packets within the network and stealing the password to network devices. Like Telnet, SSH uses TCP, just using well-known port 22 rather than Telnet’s 23.
User and Enable (Privileged) Modes
All three CLI access methods covered thus far (console, Telnet, and SSH) place the user in an area of the CLI called user EXEC mode. User EXEC mode, sometimes also called user mode, allows the user to seem around but not break anything. The “EXEC mode” a part of the name refers to the very fact that during this mode, once you enter a command, the switch executes the command then displays messages that describe the command’s results.
Also Read : Introduction to the Command Line Interface (CLI) with the help of Features
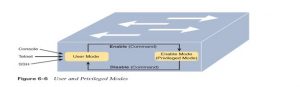
Cisco IOS supports a more powerful EXEC mode called enable mode (also referred to as privileged mode or privileged EXEC mode). Enable mode gets its name from the enable command, which moves the user from user mode to enable mode, as shown in Figure 6-6. the opposite name for this mode, privileged mode, refers to the very fact that powerful (or privileged) commands are often executed there. for instance , you’ll use the reload command, which tells the switch to reinitialize or reboot Cisco IOS, only from enable mode.
Example 6-1 demonstrates the differences between user and enable modes. the instance shows the output that you could see during a terminal emulator window, as an example , when connecting from the console. during this case, the user sits at the user mode prompt (“Certskills1>”) and tries the reload command. The reload command tells the switch to reinitialize or reboot
Cisco IOS, so IOS allows this powerful command to be used only from enable mode. IOS rejects the reload command when used in user mode. Then the user moves to enable mode—also called privileged mode—(using the enable EXEC command). At that point, IOS accepts the reload command now that the user is in enable mode.
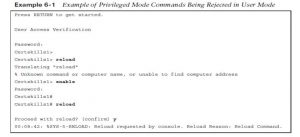
This example is that the first instance of this book showing you the output from the CLI, so it’s worth noting a couple of conventions. The bold text represents what the user typed, and therefore the nonbold text is what the switch sent back to the terminal emulator. Also, the typed passwords don’t show up on the screen for security purposes. Finally, note that this switch has been preconfigured with a hostname of Certskills1, therefore the command prompt on the left shows that hostname on each line.
Password Security for CLI Access from the Console
A Cisco switch, with default settings, remains relatively secure when locked inside a wiring closet, because by default, a switch allows console access only. By default, the console requires no password at all, and no password to succeed in enable mode for users that happened to attach from the console. the reason is that if you’ve got access to the physical console port of the switch, you have already got just about complete control over the switch. you’ll literally get out your screwdriver and walk off with it, otherwise you could unplug the power, or follow well-published procedures to go through password recovery to interrupt into the CLI then configure anything you would like to configure. However, many of us go ahead and found out simple password protection for console users. Simple passwords are often configured at two points within the login process from the console: when the user connects from the console, and when any user moves to enable mode (using the enable EXEC command). you’ll have noticed that back in Example 6-1, the user saw a password prompt at both points.
Example 6-2 shows the extra configuration commands that were configured before collecting the output in Example 6-1. The output holds an excerpt from the EXEC command show running-config, which lists the present configuration within the switch.
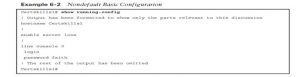
Working from top to bottom, note that the primary configuration command listed by the show running-config command sets the switch’s hostname to Certskills1. you would possibly have noticed that the command prompts in Example 6-1 all began with Certskills1, and that’s why the prompt begins with the hostname of the switch. Next, note that the lines with a ! in them are comment lines, both within the text of this book and within the real switch CLI. The enable secret love configuration command defines the password that all users must use to reach enable mode. So, regardless of whether a user connects from the console, Telnet, or SSH, they might use password love when prompted for a password after typing the enable EXEC command. Finally, the last three lines configure the console password. the primary line (line console 0) is that the command that identifies the console, basically meaning “these next commands apply to the console only.” The login command tells IOS to perform simple password checking (at the console). Remember, by default, the switch doesn’t ask for a password for console users. Finally, the password faith command defines the password the console user must type when prompted. this instance just scratches the surface of the sorts of security configuration you would possibly prefer to configure on a switch, but it does offer you enough detail to configure switches in your lab and obtain started (which is that the reason I put these details during this first chapter of Part II). Note that Chapter 8 shows the configuration steps to feature support for Telnet and SSH (including password security), and Chapter 34, “Device security measures ,” shows additional security configuration also .
Questions related to this topic
- How can I tell if a Cisco switch is SSH enabled?
- What is the correct way to configure SSH on a Cisco switch?
- What is the default password for Cisco 2960 switch?
- What is a Telnet SSH and how is it used to program routers and switches?
This Blog Article is posted by
Infosavvy, 2nd Floor, Sai Niketan, Chandavalkar Road Opp. Gora Gandhi Hotel, Above Jumbo King, beside Speakwell Institute, Borivali West, Mumbai, Maharashtra 400092
Contact us – www.info-savvy.com